Flight Software
Flight Software (FSW) is responsible for operating and navigating your spacecraft throughout its mission. NOS3 creates an environment that allows a user to simulate an end-to-end mission with a spacecraft using cFS. NOS3 Flight software is defaulted to use cFS, however F’ FSW is integrated into NOS3 as well to provide another FSW framework for users to explore.
Standalone Checkout
In NOS3, Standalone Checkouts are used to verify component functionality with your component’s simulation. Following the steps below will create a simple terminal interface to interact with the simulation. Checkouts are to be used to test your component without connecting your component to NOS3 in its entirety, therefore providing a proof of concept of operations.
The below example is a reference for the sample component.
To build the standalone version, assuming starting from top level NOS3 repository:
make debug
cd ./components/sample/fsw/standalone
mkdir build
cd build
cmake ..
Can override target selection by adding
-DTGTNAME=cpu1to thecmakecommand line
make
exit
To run the standalone version, assuming starting from the top level NOS3 repository:
Follow the build steps above, then:
make
make checkout
Launches NOS Engine, NOS Time Driver, NOS Terminal, Sample Sim, and Sample Checkout under gdb
make stop
core Flight System (cFS)
A little c because it’s a small core - cFS is the default for NOS3.
This section will describe the method utilized to interface NOS3 with cFS.
Operating System Abstraction Layer
Core Flight System is the FSW selected for the STF-1 mission partially due to the implementation of the Operating System Abstraction Layer (OSAL). The OSAL provides an API that allows flight software applications to be written without operating system (OS) specific calls. When cFS is compiled, the target OS is specified and the build system includes the proper libraries. This allows the FSW written for the FreeRTOS target to be built to execute on Linux and vice versa. This makes NOS3 an ideal development environment when using the OSAL Linux target.
Platform Support Package
In addition to the OSAL, cFS includes a Platform Support Package (PSP) that includes libraries that are not OS specific, but can be reused for a specific flight board, such as memory, clocks, timers, etc. The PSP used for NOS3 is a modified version of the Linux PSP release. In order to control timing in flight software, cFS uses multiple timers, the main being a 1 Hz timer tick. By replacing the 1 Hz timer provided by Linux with the NOS Engine time ticker we can sync the time from the PSP with the time that other NOS3 components are running.
Hardware Library
The third component of flight software implemented for hardware abstraction is a hardware library (HWLIB). The HWLIB is used for component specific I/O calls, such as I2C, UART, etc. The hardware library includes a single header file, typically provided as drivers from the on-board computer (OBC) manufacturer, that defines the I/O function calls. When building cFS, the CMAKE build system then selects the driver source corresponding to the target being built.
cFS Heritage Applications
High level reference information has been compiled for the various cFS Applications. Note that it is assumed telemetry messages are also within range without the 0x1XXX indicating a command.
cf - CCSDS File Delivery Protocol
Protocol(s): CFDP and UDP
MSGID range: 0x18B3 - 0x18B5
Perf_ID ranges: 11-20, 30+x, 40+x
ci - Command Ingest
Protocol(s): CCSDS and UDP
MSGID range: 0x1884-0x1887
Perf_IDs: 0x0070, 0x0071
ci_lab - Command Ingest Lab
Protocol(s): CCSDS and UDP
MSGID range: 0x18E0-0x18E1
Perf_IDs: 32, 33
ds - Data Storage
Protocol(s): CCSDS
MSGID range: 0x18B8-0x18BC
Perf_IDs: 38
fm - File Manager
Protocol(s): CCSDS
MSGID range: 0x188A - 0x188E
Perf_IDs: 39, 44
hwlib - Hardware Library
Protocol(s): CCSDS
MSGID range: N/A
Perf_IDs: 50
lc - Limit Checker
Protocol(s): CCSDS
MSGID range: 0x18A4-0x18A7
Perf_IDs: 28, 43
sc - Stored Commands
Protocol(s): CCSDS
MSGID range: 0x18A9-0x18AB
Perf_IDs: 37
sch - Scheduler
Protocol(s): CCSDS
MSGID range: 0x1895-0x1898
Perf_IDs: 36
to - Telemetry Output
Protocol(s): CCSDS
MSGID range: 0x1880-0x1882
Perf_IDs: 0x0072
to_lab - Telemetry Output Lab
Protocol(s): CCSDS
MSGID range: 0x18E8-0x18E9
Perf_IDs: 34, 35
cFS Tables
Several cFS Apps rely on tables to configure them. The main ones that are preconfigured by NOS3 are the ones for cf, ds, fm, hk, lc, sc, sch, to, and to_lab. The main ones the user would likely want to configure for their mission are the ds, sc, and sch tables.
DS Tables
DS, or Data Storage, utilizes three main tables - the File Table, the Filter Table, and the Indices table. The Indices table can likely be left as default in most cases, leaving the File and Filter tables as the main ones you would likely want to reconfigure.
The DS File Table is defined at {nos3_base}/cfg/nos3_defs/tables/ds_file_table.c. It handles the definition of files for the data storage app, which allow the logging of user-defined sets of packets from the cFS Bus to a file which can be saved off by the user for analysis. By default, 4 files are fully created and two more are semi-defined, and it allows for a maximum of 16 files (indexed 0-15).
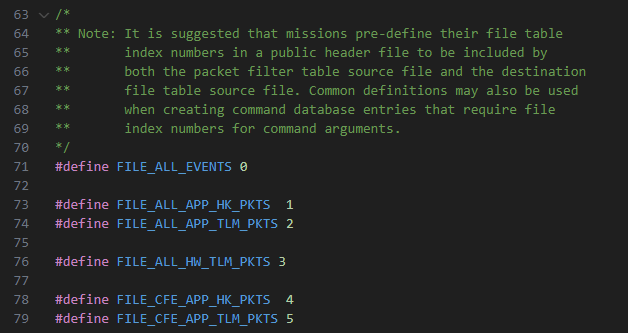
The user should start by picking an unused index, and creating a #define in the list at the top aliasing the index number of their file with its name.
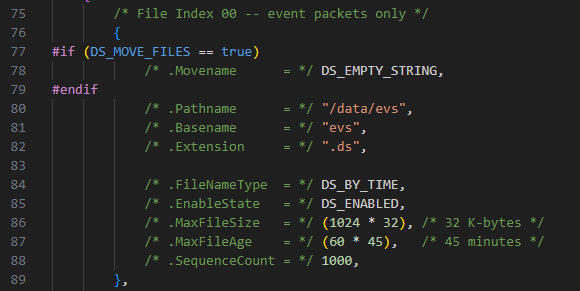
The image above is the default event packet log file for NOS3, and shows the following file attributes which the user can define.
Movename allows you to define a path where you want the file to be moved and stored on simulator shutdown.
Pathname is the relative path within the spacecraft’s base storage at which you want the file to be created (the spacecraft’s files are found at
{nos3_base}/fsw/build/exe/cpu1).Basename sets the base filename of the file
Extension sets the file extension for the file (“.ds” by default)
FileNameType defines whether you are rolling the file (and thus extending the filename) by time or count.
EnableState defines if the file starts out as enabled or disabled. If enabled, it will collect data from simulation start. If disabled, the user must manually activate it using a command before it starts collecting data
MaxFileSize defines the max size of a file before it is rolled (in bytes by default, so multiples of 1024 increase to KB, MB, GB, etc)
MaxFileAge defines the max age of a file before it is rolled (in seconds)
SequenceCount is only used if rolling by count. Otherwise can be left as DS_UNUSED. If used, will define the starting count for the file
Once the user defines all attributes as desired, the user should go to {nos3_base}/scripts/fsw/fsw_cfs_launch.sh, and after line 34 should add a mkdir command like the ones above it with any new data directory in which they plan to spawn their file. If they are spawning it in an already extant directory, this can be skipped. Then, once this is done the file should be created on startup, though it will not accrue data unless the Filter Table has already been configured to send packets to it.
The DS Filter Table is used to define what packets DS should send to what files to be stored. Initially, only the small subset of packets stored in the default files are defined, but the user can both add more packets, and define what tables new and existing packets should be sent to.
First, you should add a #define in {nos3_base}/cfg/nos3_defs/tables/ds_indices.h matching the one you added to the file table to alias the index of your table to its name, so that you can use your name later on, as shown here:
Then, the user will want to edit the entry for a packet in {nos3_base}/cfg/nos3_defs/tables/ds_filter_tbl.c. There are 256 slots for packets (indexed 0-255), of which 15 are defined by default. Below is an example of what one of these entries looks like:

The entries are structured as follows:
MessageID is the MID of the packet you wish to add. These can be found within the [app]_msgids.h files found in each app’s source code. These should already be linked into the build structure for DS, so further files should not need to be added. To add a new packet, simply find the MID you wish to add, and replace
CFE_SB_MSGID_RESERVEDin an unused entry with your desired MID wrapped withinCFE_SB_MSGID_WRAP_VALUE(), as seen in the example image.The Filter contains the entries for what files you wish to forward that packet to for storage. It contains an entry for each file, structured as follows:
The index of your file, as defined in the
#definestep above.The filter type (generally by count, so that you are collecting each packet generated)
N, which is the numerator of the ratio of packets to store by sequence number
X, which is the denominator of the ratio of packets to store by sequence number
O, which is the offset, defining the sequence number of the first packet to store So, for example, N = 1, X = 1, O = 0 would store every packet starting at the 0th index, while N = 1, X = 2, O = 6 would store every other packet starting at the 6th packet
Once you have defined all your new packets and storage parameters, then as long as your file table and directories are properly created, your file should start populating with all the right packets upon startup.
SC Relative Time Sequence (RTS) Tables
RTS Tables are utilized by the SC - or Stored Command - app to allow users to set up sequences of commands that can be triggered via a single set of commands from the ground or by a limit checker action point.
F’
(Courtesy of https://nasa.github.io/fprime/)
F´ (or F Prime) is a software framework for the rapid development and deployment of embedded systems and spaceflight applications. Originally developed at NASA’s Jet Propulsion Laboratory, F´ is open-source software that has been successfully deployed for several space applications. It has been used for but is not limited to, CubeSats, SmallSats, instruments, and deployables.
F´ has the following features:
Component architecture with well-defined interfaces
C++ framework providing core capabilities like queues, threads, and operating-system abstraction
Tools for designing systems and automatically generating code from systems design
A standard library of flight-worthy components
Testing tools for unit and system-level testing
Configuring NOS3 to Use F-Prime:
When Building NOS3 with F-Prime, it may be necessary to clone NOS3 in a
Linux environment, rather than attempt to build with shared folders. You
can use the NOS3 VM and clone NOS3 in /home/jstar/, rather than use
the github-nos3 shared folder in the NOS3 VMs Desktop. Building F-Prime
with shared folders can sometimes result in build errors due to the
shared folder, however building locally inside the Linux environment
will ensure NOS3 builds successfully.
When Configuring NOS3 to use F-Prime, be sure to edit the
nos3-mission.xml file to select F-Prime as your GSW and FSW as seen
below. After changing your mission configuration, save the file and run
make clean from your nos3/ directory. Run make to rebuild NOS3
for the F-Prime FSW and GSW configuration. Once NOS3 is built, run
make launch and wait for the F-Prime ground data system window to launch. Below is
a picture of the NOS3 Configuration needed to build F-Prime.

Note, if a NOS3 user wishes to add fidelity to F-Prime, the user must
make clean to remove autogenerated files so that F-Prime can be
built again. Once NOS3 is cleaned, simply run make to rebuild F-Prime
FSW with any new additions.
Sending a Sample NOOP Command:
After the F-Prime GDS window launches, F-Prime flight software should be running and
the Sample component can be commanded. To send a SampleSim NOOP command,
select the SampleSim.NOOP command from the drop down menu in the F-Prime
ground data system and click Send Command. You will then see the sampleSim.NOOP completed
event message under the events tab in the F-Prime
ground data system window. The below figures
represent an example of what commanding looks like in the F-Prime GDS.


Creating an F-Prime Component in NOS3:
To create a NOS3 component in NOS3, first enter a nos3 debug session by
running make debug in the nos3/ directory.
After running make debug, navigate to the
fsw/fprime/fprime-nos3/Components directory.
Here you can create a new F-Prime component by running the following
command: fprime-util new –-component
Note, you do not need to run the F-Prime virtual python environment in order to use the F-Prime framework tools to create an F-Prime project. NOS3 has included the F-Prime tools inside its docker container which is why the make debug is used to generate the new component in F-Prime.
For more information on how to create F-Prime projects, components, deployments, etc. You can see the F-Prime documentation found here: https://nasa.github.io/fprime/
The Helloworld tutorial helps a user understand how to use F-Prime and
how to get started with developing using the F-Prime FSW framework. This
tutorial explains how to setup an F-Prime project, however a user can
use the existing F-Prime project found in NOS3. That is fprime-nos3/
which is found under fsw/fprime/. The Helloworld tutorial also
describes how to create basic F-Prime connections to launch a new
component in the F-Prime gds.
The Nos3 Developers were able to utilize NOS3 Component fidelity to communicate to simulations in NOS3 without having to start from scratch in F-Prime. For example, with the sample component in Nos3, the developers were able to include the necessary NOS3 libraries and files in the F-Prime cmake files in the Component/ and Deployment/ directories. This allows F-Prime to pull in the necessary function calls from NOS3 to F-Prime fsw. For an example refer to the Sample component in F-Prime, you will see how commanding is setup in the F-Prime component by utilizing the existing NOS3 fidelity.
It is important to understand that each component has its own cmake file, so when creating new components based of NOS3 Components, you need to be sure you are including the necessary files from the NOS3 Component directory. Also, each file you share with F-Prime in the F-Prime Component, you need to share with the F-Prime Deployment. There are two cmake files in the Deployment directory
F-Prime NOS3 Time Component (Nos3Time):
Here we explain how we synchronize time from NOS3 to F-Prime by
creating our own passive F-Prime component. This component can be found
under fsw/fprime/fprime-nos3/Components. There you will find the cpp
and fpp files that make up the Nos3Time component in F-Prime. These
files are explained in more detail below.
Starting with Nos3Time.cpp, we establish a couple functions in F-Prime to successfully retrieve NOS3 Time and sync that data for F-Prime FSW.
NOS Engine supplies time on a created bus interface.
The interface is created with the following nos engine connection string:
“tcp://nos-engine-server:12000”
```

This describes the type of connection, where the connection is being
made, and on which port. This string is used when creating our Fprime Bus in the Nos3Time.cpp.

Following this, users need to set up a Bus Name and a TICKS\_PER\_SECOND
variable. These will allow for the connection of a component to this bus
via a call-back function which will provide NOS Engine time on each tick
being populated in the above created bus. This is accomplished using a
NOS Engine create bus command, and the add call back command:
Fprime_Bus = NE_create_bus(hub, ENGINE_BUS_NAME, ENGINE_SERVER_URI); NE_bus_add_time_tick_callback(Fprime_Bus, Fprime_NosTickCallback);
A callback function should look similar to the following:
void Fprime_NosTickCallback(NE_SimTime time) { pthread_mutex_lock(&Fprime_sim_time_mutex); Fprime_sim_time = time; pthread_mutex_unlock(&Fprime_sim_time_mutex); }
The local function, relative to the F-Prime component,
FPrime\_NosTickCallback() is used to retrieve the ticks (each tick is 100
microseconds). Then simple math is performed to place the seconds (upper U32
) and microseconds (lower U32) into the F-Prime time.set call described
later in this documentation.

This will pull time from the bus, and store it in a time variable
(Fprime\_sim\_time). This variable holds the number of ticks that have
been supplied on the created bus. This variable is a tick counter
variable. To convert to actual time, users will need to manipulate the
ticks into seconds and micro seconds for F-Prime. This is done utilizing
the TICKS\_PER\_SECOND variable in order to create the conversions. An
offset can be added to specify any specific start epoch.

All of this functionality can be placed in its own component, and
through the deployment topology, pointed to utilize the new time
component rather than default POSIX time. This is where we adjusted our
deployment to use our Nos3Time component instead of the default
PosixTime component in F-Prime. Below are the key lines we changed in
our deployment topology.
Instances (instances.fpp):
instance nos3Time: Components.Nos3Time base id 0x4500
Topology (topology.fpp):
time connections instance nos3Time
After the component has been integrated into the deployment, and
references to posix time removed, the component and GUI will now use the
new NOS3Time after manipulating the timeGetPort\_handler (in
Nos3Time.cpp under components) as such:
time.set(TB_WORKSTATION_TIME,0, Nos3Time_upper, Nos3Time_lower);
Note, we are overriding the F-Prime time base workstation enum, but one
could easily create another enum to use if they choose to do so. This
would be done in FpConfig.h in the F-Prime FSW. Also, we could also use the
TB\_Dont\_Care enum to overwrite time in F-Prime, but this adds a slight
delay at the beginning of time synchronization between nos engine and
F-Prime.

### F-Prime Sequencing
Creating sequences in Fprime can be done using the following steps:

1. Use the `Sequences` Tab in the Fprime GDS to construct your preferred sequence. Name it accordingly with a .seq file extension and download it using `Save As`.

2. Put the sequence file in the `fsw/fprime/fprime-nos3/Sequences/` folder

3. Enter debug mode (`make debug`) and navigate to `fsw/fprime/fprime-nos3`. Compile the sequence into a .bin file using the below command.
fprime-seqgen Sequences/[filename].seq -d build-artifacts/Linux/deployment/dict/deploymentTopologyDictionary.json
Running sequences can be done through a variety of ways:

* In Fprime GDS, use the CS_RUN command with the file parameter being `Sequences/___.bin` and the preferred blocking option.

* For startup scripts, modify the docker exec command at the end of `scripts/fsw/fsw_fprime_launch.sh` to run your specific `sequence.bin` file. Alterations can be made in the Makefile's `build-fsw` for sequence compilation.

* The `fprime-cli` command has the ability to manually run sequences through the `CS_RUN` command similar to how the startup sequence works.

### F-Prime Documentation links:

* F-Prime github Docs: [https://nasa.github.io/fprime/](https://nasa.github.io/fprime/)
* F-Prime cpp Docs: [https://nasa.github.io/fprime/UsersGuide/api/c++/html/index.html](https://nasa.github.io/fprime/UsersGuide/api/c++/html/index.html)
* F-Prime fpp Docs: [https://nasa.github.io/fprime/UsersGuide/user/fpp-user-guide.html](https://nasa.github.io/fprime/UsersGuide/user/fpp-user-guide.html)